One of the cutest photo manipulation techniques around is the Doll Face or Manga. Those big eyes, button nose and pouty mouth can be adorable and it gives a great effect to a range of manipulations and digital art.. Today I’m going to show you how to achieve this effect using The Gimp.
I first came across this technique via a blog post and a tutorial for photoshop. I really enjoyed using it and I thought I would put together a tutorial for those of us who prefer to use The Gimp. Before we begin I would suggest you try going through the tutorial using the same image as I have so that you can use the screen shots as a reference. If you need a larger view of any of the screenshot images, just click on it and it will open in a new window for you to zoom into.
You can find the model image here, generously made available by Nixstock on Deviant Art. You will also need this texture from Skeletalmess on Flickr. Download these files and open your model file in The Gimp.
Step 1.

The original image is a little skewed so you'll need to rotate it so that the eyes are level by using the rotate tool (you'll find this in the toolbox - you can hover the mouse over each one to find out which one it is).
Duplicate the image and right-click the top one and click on Scale Layer. This is the resize tool and you'll need to make the face in this layer about 30% larger than the original image below (you can try 1800 wide X 2400 high today). Next, go to Image>Fit Canvas To Layers. It's not entirely necessary but it'll give you plenty of space to work with later.
Step 2.

Now duplicate both layers and arrange them by moving up and down so that you have Large/Small/Large/Small. Click on the little eye on the bottom Large/Small pairing to hide them - they will be your back up copies in case you make a mistake and need them later.
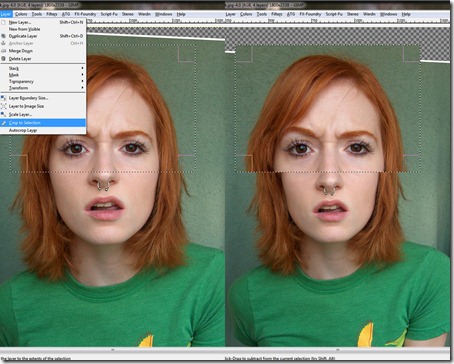
On the top visible layer using the Rectangle Select tool draw a box around the top half of her head making sure you have all her hair on the top and sides as well as most of her nose in the selection. Click on Layer>Crop to Selection. You should see just what you selected inside the box and the layer below outside the box. Click once in the checkered area to deselect the box (you will know it is deselected when the little squares in the corner disappear).
Now click on the eye beside that layer to hide it while you crop the lower half of her face on the smaller layer. This time cover most of the nose again because we will need overlap later when we blend the two halves together. You should be left with just the two halves on your screen like the right hand side of the image above.
Step 3.

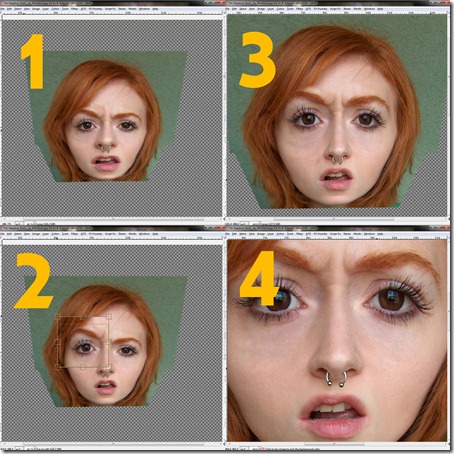
OK, now we're at the first tricky part. Using the Perspective Tool, transform the top and then the bottom half like I have in the image above. You transform the image by clicking and dragging one of the corners of the image on that layer.
1. Is the original view.
2. Select the top layer and bring the bottom corners in so they line up with the bottom layer. Drag each of the top corners down so you squash the top of the head a bit. Don't worry too much about getting it right straightaway as you can come back and adjust later.
3. Select the bottom layer and bring the bottom corners in AND up. I don't usually push the chin up too much here using the Perspective Tool as after I have transformed the bottom half of the face I usually use the Scale Tool to push it up some more by clicking on the bottom line and pushing up. It seems to look better that way. You can also use the Scale Tool later to shrink or grow the forehead when you are working with the features.
4. Is what you should roughly have on your screen when you are finished.
Step 4.

Now we're going to raise the bottom half of the face to the top. This is because it is usually easier to blend the bottom half to the top than it is to blend the top half to the bottom.
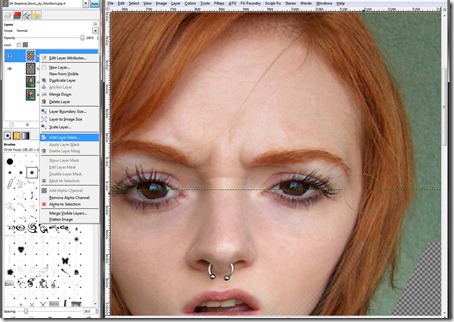
Right click on the bottom half layer and select Add Layer Mask. Select a large soft brush (one with blurry edges) and Lower the opacity to around 15%. Select the Eraser tool in your toolbox. Click on the arrows on the Foreground/Background colours so that the white is on top. (When the white is on top, you will erase, when the black is on top you will bring it back.) Using this, click along the line so that you lose the line defining the two layers. The main areas to focus on is the bridge of the nose, the hair and making the edges of the face blend in naturally. Don't worry about the eyes as they will be covered by another layer later.
Step 5.

Now we're going to rebuild her facial features. Duplicate the original larger layer that we saved before and raise it to the top. Duplicate it 3 times so that you have four copies all up. Click on the eye on these new layers to make them visible. It may help you to name each layer. You can do that by right clicking the layer and choosing Edit Layer Attributes and renaming them in the window that appears. They should go in this order from the top down: Eye on Left, Eye on Right, Nose & Mouth.
Using the Rectangle Select tool again make a selection around the eye on the left leaving plenty of space around and including the eyebrow. Leaving the space makes it easier to blend each of the four pieces in later. Now go to Layer>Crop to Selection. Click on a checkered area of the screen to deselect the box. Next do the other eye, nose and mouth in the same way on the other 3 layers. When you do the last you should have a composite like the left side of the image above.
Now it's time to get her features ready to go back on the face. Click on the Move Tool click on each part of the face you just cropped and drag them to below the bottom of the face. Right click on each layer and select Add Layer Mask. Click on the Eraser Tool and choose a soft brush at 100% and cut in around the edges of each feature like I have done in the image above. With some faces you may need to take off the brow bit above the nose, each face is different and with practice you will get the hang of which one needs it and which one doesn't.
Step 6.

OK, now we're at the second tricky part fitting her face back together. We're aiming for large open eyes, button nose and pouty mouth. There are two tools to use for this, the Scale Tool and Scale Layer (Scale tool is in the toolbox and to use Scale Layer right click on the layer you want to resize). Right click on each of the top four layers and select the Edit Layer Mask with the tick beside it. This will turn off the Layer Mask and allow you to move the layers around.
1. Move the pieces back over the face to roughly where they'll go.
2. With the resizing, I usually start by working from the bottom up as the eyes are the trickiest part to fit in. Make your mouth more pouty using the Scale Tool. I usually click on the bottom left corner and move it in to the right and down a bit. Don't go too far though, realism is the key. The nose I use the Scale Layer and usually I shrink it by about 30%. You'll see with practice what is too big and what is too small. Lastly is the eyes. Using the Scale Tool again you're aiming for open and large. Keep an eye on the pupils and make sure they stay round. If you don't get it quite right the first time you can hold down the Ctrl key and hit the Z key to undo the last step or use the Scale Tool again until you are happy with the size.
3. You'll find you'll have to move the features around quite a bit until you are happy with them.
4. Now it's a case of blending it all in. This is the trickiest part of the whole process. Right click on the layers and select the Edit Layer Mask again and put the opacity back down to 15%. Using the Eraser tool blend in your parts so it's each part looks realistic. You'll have to erase part of the eyebrow of the eye on the left to bring the hair through. Switching between erase and add to blend in the features. Sometimes parts of the face will poke through underneath, this is why leaving a large area around the features before helps as you have skin around to use in the blending in process. It's important to zoom in to make sure everything is OK (you can hold down the Ctrl Key and roll your mouse wheel up to zoom in and down to zoom out).
Step 7.

Now we're on the home stretch. Once you're happy with your face it's time to stick it back on the body. Click on the eye on your smaller original layer. It will come up like the image on the left above. Right click on that layer and using Scale Layer shrink it down until the neck is as close as the same size as you can get it. It's usually 30-50% smaller than it was originally. You'll have to move the layer around a bit and it won't fit perfectly because we warped the face. You can blend them in by using the Layer Mask on the bottom half of the face and blending it in. With some images you may find another body to use instead of the original and that can give you a lot more scope with your final image. With this image it shouldn't be too hard to blend the head to the body.
Step 8.

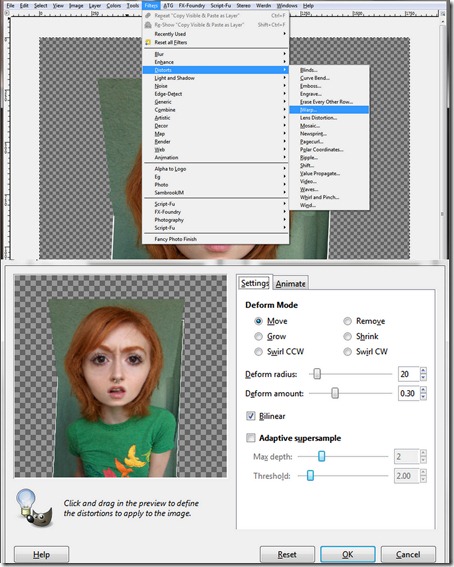
Sometimes your face can be a little diamond shaped, you can use the iWarp Tool to make minor adjustments to the shape of the face. Before we do this we need to put merge our image into one layer. There are scripts for the Gimp to copy the visible layers and past it on a new layer. I couldn't find it in time to give you a link for this tutorial so I will show you what I used to do before I had that handy tool. Go to File>Save As and save your file with a Part 2 in the name.Once you have done this go to the top layer,right click and chose Merge Down. Do this for each of the layers that make up your finished model. Once you have done that create a transparent layer below your model layer and merge that down onto the transparent layer.
Once you have your face on a single layer go Filter>Distort>iWarp. This will bring up the window same as the bottom half of the above image. Using your mouse carefully click on the part of the face that is wrong and drag it over. There is no need to adjust any of the settings on the right hand side. I usually make small adjustments,click OK and go back and make more if needed. Be careful with this tool as it can sometimes do weird things to the pixels if you do too much. It's a very handy tool to use though as it can make a huge difference to the overall look of your image.
Step 9.

Now that we're finished the face it's time to think about what we're going to do with our creation. In a lot of cases you can put in a background but for this tutorial we're just going to put a texture over it to feature the model.
1. Using the Clone Tool set to 100% opacity and using a soft brush, select a part of the background (I used the top left corner) and start cloning the background around the model. You will notice that the background is not uniform everywhere in colour around the model. You can blend it in by lowering the opacity of your brush and gently bring the new uniform colour in close to the model.
2. Once you are happy with the new background use the Select Tool to crop your image (Image>Crop To Selection - this will crop all layers).
3. Now it's time to bring in the texture you downloaded before. (File>Open As Layer-bring it to the top). Set the Mode to Divide and bring the opacity down to about 35%.
4. Go to Colour>Colourize. You can slide the Hue/Saturation/Lightness sliders around until you get colours that suit you. Then click OK.
That's it, we're done. Hopefully you were able to follow the tutorial to the end easily and you have something similar to the above image. If you have any trouble along the way feel free to ask and I'll try to help you get through. Good luck and have fun.

Please note: If you would like to feature this tutorial on your blog or website, please only use the first image and then link back to this page. I put a lot of time and effort into putting it together and I’d prefer it that people come to my blog to read this tutorial and the others that I have on offer. Thanks.
Some Before & After examples of this technique:

No comments:
Post a Comment