
This tutorial is the second half of two. If you are a brand new beginner to using the Gimp and haven’t yet learned to use a Layer Mask, you can find the first half of the tutorial here where you learn how.
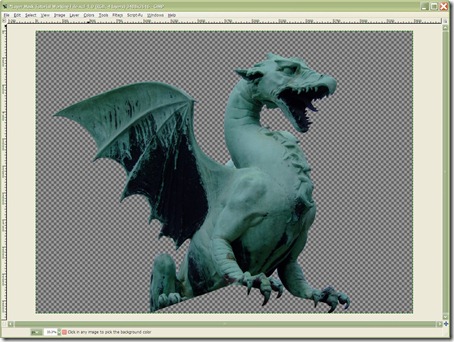
At the end of the tutorial we ended up with a dragon in a .XCF file with the background removed. We will be using techniques described in the last tutorial so if you need, keep it open in another tab for reference. In this tutorial we will be using Layers. Each image you import as you progress is called a layer and eventually all those layers work together to become the final image. Start by opening your Dragon .XCF file from Part 1. It should look like the image below.
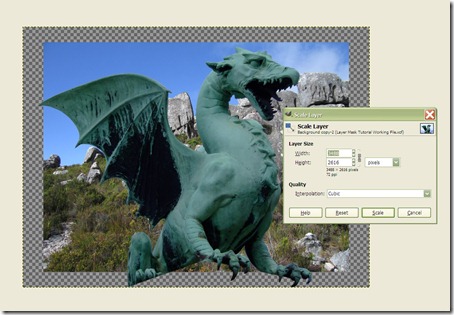
First thing we need to do is add a background for the dragon to sit above. I have used this rocky outcrop from here as it gives some great boulders for the dragon to perch on. Once you have downloaded the image to your desktop go to the top menu bar and click File > Open As Layers and chose the rocky outcrop image. If it appears above the dragon you can use the down arrow in your Layers Box to move it underneath. Now we need to resize the dragon. In the Layers Box right-click the dragon image and choose Scale Layer. It will bring up a window like the one you see in the image below. Put the number 850 in Width. Click in the Height box and it should automatically change to 638. Click Scale. The image will now be much smaller.
Now we are going to place the dragon on his new perch. (Important note: If you followed the first tutorial you will have to switch off the layer mask first by clicking on the thumbnail of the dragon in the Layers Box. This will put a white box around it and turn off the layer mask. You can turn it back on by clicking the black & white box beside it. You will see the white box move over to there. The white box is a visual indicator to whether the Layer Mask is on or off.) We need to have the dragon face the other way. You can do that going to the menu in the image window and choose: Layer > Transform > Flip Horizontally. He will now face the other way. Click on the Move Tool as indicated by the arrow in the image below and move him to his new position on the rocks which you will see in the second image below.


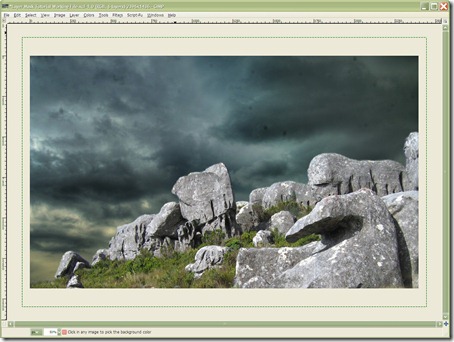
Now we need a new dramatic sky and to put it in place. I used this image here. Load it the same way you did the rocky outcrop image and move it so it is above it. You’ll notice that it is wider than the rocky outcrop image, don’t worry we will be cropping the whole image later so they don’t have to match exactly. Use the move tool again and move the clouds up a bit but make sure that it covers all of the original sky in the rocky outcrop image. When you have done that go to the menu in the main image window and choose: Image > Fit Canvas to Layers. This will show all of your new sky and you should have something like the image below.

Before we do that the next step is easier if we hide the dragon for a while by clicking on the Eye Icon beside it’s thumbnail in the Layers Box. To make it easier you can lower the opacity of the layer down to 80%. Now we have to use a Layer Mask on the clouds so that we can see all the rocks. You can find the slider for that in the Layers Box. Make sure that you have the clouds layer selected. With a larger soft brush set to 100% opacity, cut in as close to the edge of the rocks as you can, like you see in the image below. Erase all of the sky that falls below the rocks.

Now bring the opacity of the clouds image back up to 100% and put the opacity of the brush down to 15%. Zoom into the image and gently work your way to the edge of the rocks without showing any of the blue of the original sky (remember you can hit Ctrl + Z to undo your last actions). When you are done it should look like the image below.
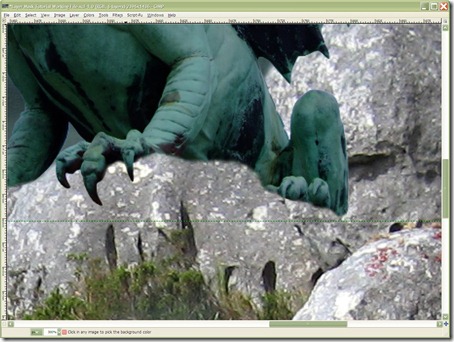
Ok, now to make the dragon look like he really is sitting on the boulders. If you followed the first tutorial you will still have the original layer mask. Turn it back on as described above. We will need to cut into the dragon image a bit to get rid of the straight line between his front and back legs. Using a small soft brush set to 100% opacity cut in a rocky shape like you see in the image below. Your dragon should look like he is perched on a rock now.
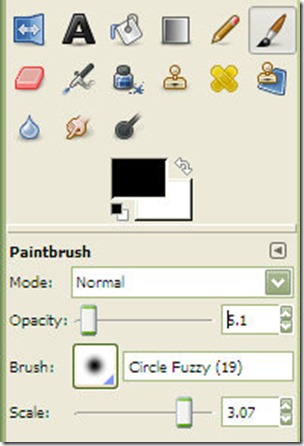
The next step is to give him some shadow below his feet and body to give that extra bit of realism. To do that we need to make a transparent layer between the dragon and the rocky outcrop. We’ll need to use the Paintbrush Tool in your Toolbox using a Large Soft Brush set to about 5.00 size & 5% opacity as you see below. Start by clicking under his claws (don’t worry it won’t show on his claws but on the transparent layer underneath). The general rule of thumb is that shadows are darker directly underneath things touching the ground (or in our case the rocks) and quickly lighten as you go further out. Remember if you aren’t happy, you can delete the transparent layer and try again. When finished it should look somewhat like the second image underneath.

What’s a dragon without the fire breathing? Next we’re going to give him some fearsome fire. This we will do using a trick with Layer Modes. First of all you’ll need to download some fire. I used this one here because it had a dark background. That’s important as you shall see shortly. Once you have opened your fire as a new layer above the dragon you’ll need to rotate it. You’ll see an arrow pointing at it on the right of the image below. Click on that and then your fire image. A window will pop up but you don’t have to adjust any of the values on that. Click on the top right corner of the image and drag it around until you are happy with the orientation.

Now we’re going to use Layer Modes to make the fire look like it’s really there. Make sure you have the fire layer still selected. Above the layers in the Layers Box you will see the Layer Mode drop down menu (see image below). Click on that and choose Lighten Only. This will make all the black around the fire transparent and leave only the flames. There is also some of the fire reflection below that which you can erase by putting a Layer Mask on the fire layer and gently brushing them away. You should have only the fire left as you see in the bottom half of the second image below.


Ok now lets give the dragon some fearsome eyes. The eyes I used are here, but there is no reason why you can’t use something different. A quick Google search of either cat’s eyes or reptile eyes will give you a great choice. Remember to do an advanced search for CC images. If you are using the same image as me load it above the dragon, choose your colour and crop it by using the Rectangle Select (indicated by the red arrow in the image below) to draw a square around the eye. Then go to the menu above the image window and select: Layer > Crop To Selection. Resize the image so that the eye is the same size as the dragon’s (roughly 30 – 35 pixels square). Add a Layer Mask and gently brush away the edges of the square with a small soft brush. It is easier to lower the brush’s opacity to around 15%. You should now have an eye similar to the bottom of the second image below. (Note: Now that you know how to use the crop function you can crop your image to your liking at any time by using: Image > Crop to Selection instead.)


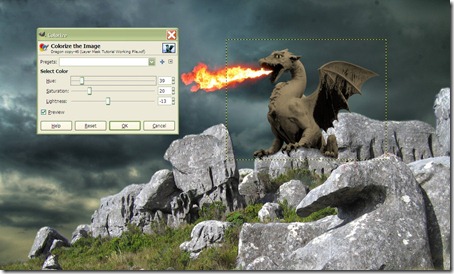
Now for an optional step. If you are happy with the colour of the dragon, skip to the next step. If you would like to change his colour, read on. Click on the dragon layer and then on the image box menu choose: Colour > Colourize. That will bring up the window that you see in the image below. You can use the sliders to adjust the colour of your dragon to one you like. Once you are happy with the colour click on OK. You can hit Reset to go back or Cancel if you change your mind. Remember you can always hit Ctrl + Z to undo the colour change if you change your mind.
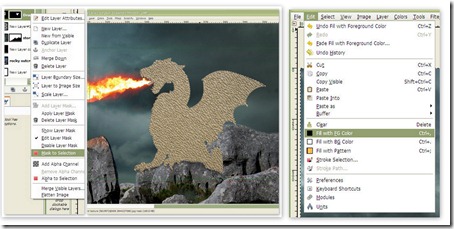
Now we’re going to give the dragon’s skin some texture. I tried to find some reptilian skin to use to no avail so I settled on a sand texture which you can find here. Now you could use a Layer Mask to cut in on the sand texture for this step but seeing as we have already done all the hard work we’ll use a Mask to Selection instead. First we need to load the sand texture and resize it so that it just covers the dragon (1000 x 662 pixels should do). Right click on the dragon layer and select Mask to Selection. You should see a dotted line in the shape of the dragon now. Drag your sand texture so that it covers all of the outline and add a Layer Mask on it. Go to your image window menu and choose: Select > Invert. Then choose: Edit > Fill with FG Colour as you see in the image below. That should leave you with dragon shaped sand. Lastly go to Select > None which should remove the outline. Now we need to use a Layer Mask to blend the sand into the skin. In this image I used Soft Light at 65% Opacity. Have a play around with the different Layer Modes and find one you like. You can lower the Opacity as I have done to tone down an effect.
The rocky outcrop layer is looking a little bright for the overall image so to tone it down a little go to: Colour > Brightness-Contrast. Lower the brightness and raise the contrast to similar values in the image below. This should now make it look more like night time which suits the image better.

We’re nearly there. We’re going to add some orange glow to the dragon and rocks now to add a touch more realism. Add a transparent layer above the dragon and set to a Colour Layer Mode. Choose the Paintbrush tool with a large soft brush set to 5%. Then click on the top square below that which should bring up the Colour Choice window. Choose a dark orange colour and start gently adding some of the orange to the dragon and rocks like you see in the second image below.


Another optional step for you is to add a fake Depth of Field on the foreground of the rocky outcrop layer. It’s deceptively simple and adds some interest to your image. First you need to duplicate the rocky outcrop layer. Click on the top copy and put a Gaussian Blur of 10 pixel on it. You can find it under: Filter > Blur > Gaussian Blur which will bring up the below image. Once you have done that put a Layer Mask on it and erase all but the rocks in the foreground like you see in the second image below.


Last step is to add a texture to the image. I’ve used a texture that has a vignette built in but you could use any of a hundred different kinds. The texture I used is here. (Note: if you haven’t cropped your image to the final size yet, it’s best to do it before you load your texture) Load your texture and scale it so that it covers your image. I set the Layer Mode to Grain Merge and I took the extra step of putting a Gaussian Blur of 10% pixels. And there you have it folks, your final image. Of course there are many variables that can change an image a lot. I would suggest that you play around with any image as you work on it because it can sometimes make the difference between a good image and a great one. Layer Modes and the textures you use can often bring the biggest and best changes and they are what I fiddle with the most. I hope that you were able to follow this tutorial easily and happy with your results. I’d love to see them in the comment section below (small or medium size). As always feel free to add your questions or own tips below. If you do post your image anywhere online please remember to thank all the people whose images and textures you used (and to link back to them of course).


No comments:
Post a Comment