
Today we’re going to learn how to cut out an image using the Layer Mask took in the Gimp.
The Layer Mask tool is used to make parts of your image (or more precisely the layer that you are working on) transparent so that you can make composite images. It is one of the most common tools you will end up using in the Gimp, especially if you end up making digital art as much as I do.
When I first starting using the Gimp I had no idea where to start and it was hard to find any good basic tutorials. I have written this tutorial for absolute beginners in mind. I hope that I have made it easy enough for you to follow. There is also a companion tutorial to this one. The second tutorial will show you how to make the dragon look like he is sitting on a hilltop blowing fire. If you are already comfortable using a layer mask you can find the second tutorial here.
First of all you need to download the dragon image I have used in the tutorial. You can use any image you like but it is easier to use the same image so that you can use side by side comparisons as we progress. You can download the dragon from here. Once you have opened the dragon image in the Gimp make a copy of the dragon by clicking on the Duplicate Layer Icon in your Layers Box as indicated by the red arrow in the image below.

Duplicating the layer is not totally necessary but a good habit to be in to save time in case of mistakes while working on an image. You’ll notice an Eye Icon next to both copies of the dragon in your Layers Box. Click on the bottom one to make that copy invisible. We will only be working on the top dragon for now.
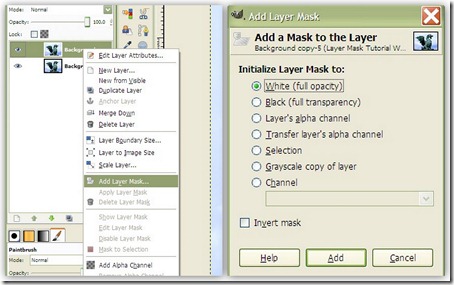
Now we need to add a Layer Mask to the top dragon. Right click on the dragon thumbnail image to bring up a menu. Choose the Add Layer Mask option. This will bring up the Add Layer Mask window. It should look like the image on the right below. Click Add. You will now see a white box beside the dragon thumbnail in the Layers Box. As you start erasing around the dragon you will notice some of that white turning black. That is to indicate what has been erased.
Now we need to start erasing. To do that you need to click on the eraser icon in your Toolbox as indicated by the red arrow in the image below. At the bottom of that section of the toolbox you will see a black square above a white one with two joined white arrows. Click on the arrows to swap the position of the black and white. When using the eraser tool with a layer mask, having the white on top will erase the image and having the black on top will un-erase it. You could just use the eraser tool without a layer mask but the Gimp but once it is gone you can’t bring it back. With a layer mask the Gimp will remember the whole image and you can adjust it as you need.

Next we need to choose a brush to use while we are erasing the background of the dragon. Below is an image to indicate where you will find your brushes and the eraser tool. On the right side you will see two slide options for Opacity and Scale. Opacity is used for the lightness of the brush and Scale is for the size. Feel free to try them out on your image in a section of the sky as it will all be erased by the end.

We will be using two brushes today. We will start with the large sharp brush on left side to erase the majority of the background and use the smaller softer brush on the right to get in close to the dragon.
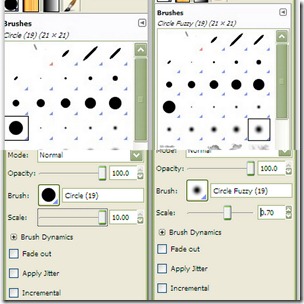
Ok now we are ready to begin. Set your brush to the same levels as shown on the left above and starting from the outside in start clicking on the sky. You should see grey checkered pattern where you click. You can hold down your left mouse button to do a lot at once. If you accidentally erase some of the dragon you can hit ‘Ctrl +Z’ to reverse your last action. Get in as close to the dragon as you can as this will save you time later. By the end you should have something that looks like the image below.

Now that you have finished removing the majority of the background, we need to start erasing close into the dragon. Set your brush as shown in the right side of Image 6. To zoom in on the image hold down the ‘Ctrl’ key and roll your mouse wheel up (or roll it down to zoom out). On the bottom left of your image window you will see a number that gets larger as you zoom in. I recommend that you zoom into 800%. The image will be quite pixelated but you need to be that close to differentiate between the blue of the sky and the green of the dragon. You will see the zoom indicator in the image below.

Before we start erasing the rest of the background we need to put in a black background so that we can see all the bits we missed. Using a soft brush is needed for this part of the process but it can leave smudges of background that are hard to see with the chequered background. Click on the bottom dragon image. We do that because the new layer will be put in above it but below the image we are working on. At the bottom of the layers box you will see a row of icons. To the left of the up and down arrow you will see a rectangular icon. That is the New Layer icon. Click on it and it will bring up the window in the image below. You wont have to change the Width or Height as that is set to the size of the image. The Layer Fill Type will be set to Transparency. Click on the white instead and then click OK. (Note: you can move the selected layer up or down by clicking on the arrows beside the New Layer icon you just used – if your )Next in the menu above the image click on Colours > Invert. That should turn your white layer into a black one. If you like, you can leave the black layer visible while you do the fine erasing but I tend to use it only to check that I have cut in close enough. You can click on the Eye Icon to hide or show it as you need.

Now you are ready to start the erasing the rest of the background of your dragon. I would suggest that if this is your first time start further out and work your way in. Because you are using a soft brush the circle will go inside the line a little. With practice you will learn to instinctively know where to place your brush as you click along the edge. The idea is to remove all traces of the original background which would look like a white outline when placing the dragon above a new background. Aim for closeness as indicated in the image below. In some corners you will need to make your brush smaller to get in. Don’t be afraid to change your brush size as you need. Feel free to zoom in and out to check on your progress as you work. (Note: Save often as you work. The Gimp is known to crash occasionally and it is very frustrating to have to redo things because of this. Remember to save it with a .XCF file ending which will remember all your layers. Saving as a .JPG file will not.)
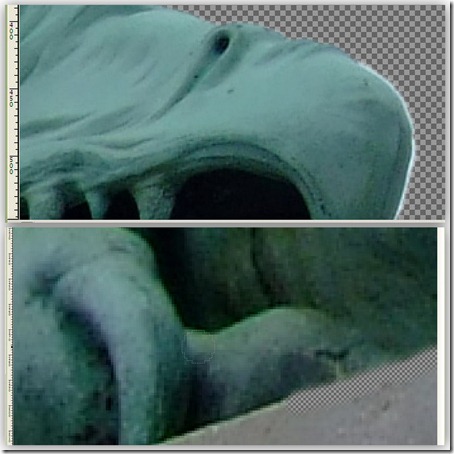
This is a time consuming process, especially as the image is a large one. You could resize the image to save time but you will have less fine control with a smaller image. I always try to use the largest images as possible so that any little mistakes will be virtually invisible in the final image. Once you have erased all the background it is good practice to go around the image to do a final check to make sure you have removed all the smudges. As you will see in the image below my edge is not exactly straight on the wing. This can usually be fixed easily to give a straighter edge. Zoom out to make sure you have it right. Also be aware of the intended bumps of the image. As you can see the neck has ridges that are supposed to be there.

In the image below you will see a dark blue edge of the tongue. That isn’t part of the background but colour blur which is a side effect of bright conditions with digital photography. You could do two things to fix this. You can erase it now but that can make your image look not-quite-right, especially if it is quite pronounced. I tend to leave the colour bleed and use the paintbrush to change the colour only if it is noticeable with the new background.

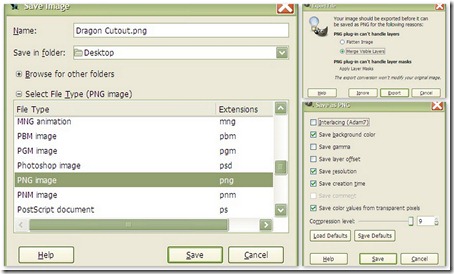
Now that you are finished you should have a dragon that looks just like the first image above. If you are going to follow the second half of this tutorial, save as an .XCF file. If you would like to use this dragon in several different images it is handy to save it as a .PNG file. This will preserve your transparency that you have put in a lot of work creating. Saving as a .PNG will bring up the below 3 windows. You can use the default settings in each of them and click Save/Export.
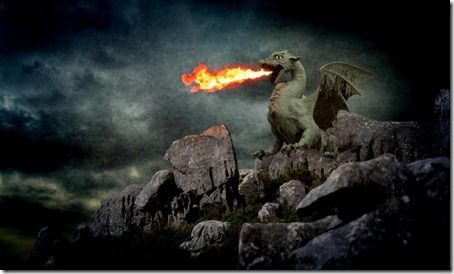
This is the end of Part 1 of my dragon tutorials. Part 2 will show you some tips in backgrounds, layer modes, texturing, colouring and fake depth-of-field. At the end he will look something like the image below.

No comments:
Post a Comment