Sometimes you’ll find your image lacks that je ne sais quoi, that certain something to take it to a new level. One of the most popular ways to add a photographic or hand-made texture to your image. Textures can also be handy when you want to change the colour or even to bring together different layers in a photo manipulation.
This tutorial has been written for beginners who have never used a Texture before and would like to learn what they are and how to use them.
Before we begin I should let you know that if you are using somebody else’s texture you should make yourself familiar with Creative Commons licenses and make sure that you use an image that has an appropriate one to fit your intended use of the final image. You can find more information about them here.
Now that we have touched on licenses lets talk about the different kinds of textures that you can use. I tend to think of them in 4 different categories:
Photographic Textures:
- These textures are literally photographs or scans of textures that you find in real life. The could be almost anything but some of the most popular types are sand, stone, paper, rust and paint. If you have a camera and wanted a texture that you own outright and didn’t want to go to the trouble of creating your own or searching for a texture then this is the best option for you. You may already have some images in your collection that have the kind of textures you need so it’s worth having a look.
- There are some very clever people out there who make textures for people to use such as the excellent people in this Flickr Group and if there is a link >here<, then I have written a tutorial on how to create your own. Hand Made textures usually (but don’t always) consist of one or more photographic texture manipulated together. They are popular as they can often be far more subtle than a plain photographic texture and can also be created in a large variety of colours.
- These textures are usually hand made but I put them into a separate category as I don’t always want a vignette effect with a texture. Your traditional vignette texture is darker around the edges and lighter in a circular fashion in the middle. The term is borrowed from photography and is still very popular as it is an easy way to draw focus to the centre of your image.
- Lastly we have colour textures. These can be Photographic or Hand Made and can also be a vignette. I put them into a separate category because I will usually use a Colour Texture for a specific reason. They are best used to create a mood in your image or if you are creating digital art they can help bring your layers together if they have different tones. There are also multi-coloured textures that can be used to great effect in a image.

Open up The Gimp and load all the images with the base image as the lowest layer. Turn off the visibility of all the textures except the Photographic Texture layer (by clicking on the ‘Eye Icon’ on the left in the Layers Tab).

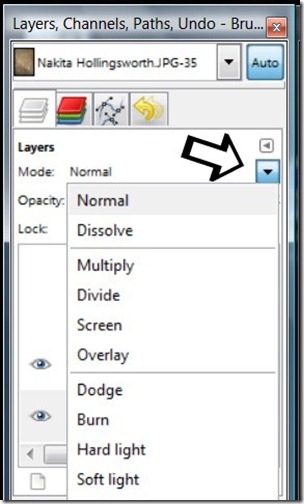
Also in your Layers Tab you will see a drop-down arrow to the right of the words Mode: Normal. This is the menu where you set the Layer Mode of the particular layer that you have selected. Click on your Photographic Texture layer and then choose Multiply. This will make the texture transparent and will show you right away how a texture can change an image. Go through and try all the modes just to see how they look. You’ll see a variety of different effects as you go through them. Did you see one you like? I will often try most of these modes when using a texture. With some of the darker modes I will also try lowering the opacity of the layer if I need a lighter effect.

Now not every texture is going to work with a particular image and you may find that you'll try a few before you find the one that gives you the effect you are looking for. Below I’ve listed the Layer Modes and Opacities of the textures that we have used today in the settings that I think works best so that you can try the same settings and see if you agree.
Photographic:
- Hue Mode at 100% Opacity
- Multiply Mode at 25% Opacity
- Soft Light Mode at 100% Opacity
Vignette:
- Overlay Mode at 100% Opacity
- Colour Mode at 100%

Sometimes it helps to use more than one texture to get the effect you want. To give you an example of how this works, above you will see two “Vintage” looks that I have created with the textures we are using today. To get the same effect I have put the settings below.
Left Vintage Look:
- Photographic Texture on Hue Mode at 100% Opacity with
- Hand Made Texture on Lighten Only Mode at 100% Opacity
- Vignette Texture on Grain Merge Mode at 60% Opacity with
- Hand Made Texture on Colour Mode at 70% Opacity

No comments:
Post a Comment